The .htaccess file is a directory level file and it is a configuration file. It is used to manage the security restriction for the specific folder in which it is present.
In order to add any code to the ‘.htaccess’ file, first you need to check if it already there in your file list. Usually the .htacccess file is present in the root directory since this will let us manage the entire set of files for a site. Root folder for the account differs on various platforms. If you are using cPanel, check in ‘public_html’. You will find the file there, if it is already there.
If it is not there by default, you need to create it or upload it. Uploading a .htaccess file is not like uploading any other file. It’s a simple work. But most of the times it is difficult to find out how exactly to do this because you will not find proper instructions anywhere since it is ignored as basic knowledge. For bloggers who want to do such simple fixing and editing on their own, here are the simple steps on how to do it yourself.
 How to create an .htaccess file?
1.Open a notepad in your computer and save it as ‘test.htaccess’. You can keep the file blank.
2. Now upload this file to your web file account or hosting account under ‘public_html’ folder via cPanel.
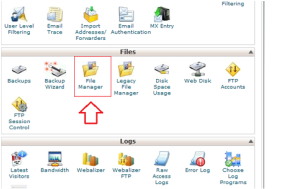
3.In order to upload the file, go to FileManager in your cPanel.


In order to add any code to the ‘.htaccess’ file, first you need to check if it already there in your file list. Usually the .htacccess file is present in the root directory since this will let us manage the entire set of files for a site. Root folder for the account differs on various platforms. If you are using cPanel, check in ‘public_html’. You will find the file there, if it is already there.
If it is not there by default, you need to create it or upload it. Uploading a .htaccess file is not like uploading any other file. It’s a simple work. But most of the times it is difficult to find out how exactly to do this because you will not find proper instructions anywhere since it is ignored as basic knowledge. For bloggers who want to do such simple fixing and editing on their own, here are the simple steps on how to do it yourself.
How to create an .htaccess file?1.Open a notepad in your computer and save it as ‘test.htaccess’. You can keep the file blank.
2. Now upload this file to your web file account or hosting account under ‘public_html’ folder via cPanel.
3.In order to upload the file, go to FileManager in your cPanel.
4.Click on ‘Upload’.
5.Browse for the file saved earlier in your computer, ‘test.htaccess’. Let the permission for the file be 644
6.Now go back to the FileManager and refresh it, you can see the file just uploaded listed there. It will be saved as ‘test.htaccess.txt’.
7. Select the file by clicking on it and right click on it. You will see the option to rename the file.
8. Rename the file from ‘test.htaccess.txt’ to just ’.htaccess’.
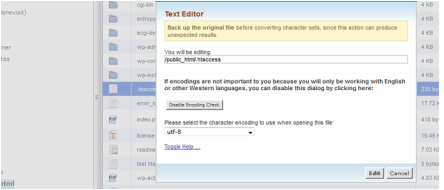
9. In order to edit this file, select the file and right click as in earlier step, you will see the ‘Edit’ option there. Click on it and then you can see the space where you will be able to add your code. Just add the code and click on ‘Save Changes’.
Most of the application like WordPress plugins requiring ‘.htaccess file’ editing will write the code to the file automatically when the permission is set properly. However, sometimes you may need to edit and write the code manually.